Template

How Do I Create a Subsection with Bundledocs?

Bundledocs offers so many ways for you to order, format and customise your documents. No matter what type of bundle or document booklet you are creating, many of you will need to organise your documents into sections. But did you know you can easily create subsections and multiple sectioned bundles with Bundledocs. If you want to know how to create a subsection, then keep on reading.

Working_With_Sections.png

How To Create a Subsection for your Bundle

Creating sections and sub-sections is really easy. We find it’s often easier to see it in action so we’ve created a short video so you can see how to create subsections in Bundledocs.

  1. Rename Section. To rename any section all you need to do is double click. This works for documents too!

  2. Create Sections. Simply use the ‘Create Section‘ button to add additional sections to your bundle. Anytime you need to create a subsection, you must first create a section, so this is where you start.

  3. Arrange Documents. If you have already uploaded documents into another section, not to worry. You can easily arrange files by dragging or dropping. We’ve even introduced our ‘Move with a Click‘ feature to make it even easier to move multiple documents at once.

  4. Create Subsection. To create a subsection, simply drag and drop the section you want to into the section above. In our example, the section above (i.e. Reports) is already open/expanded so we simply need to drag the section to the right to create our sub-section.

Remember, you can create as many sections, subsections and volumes as you need. So create your bundle early in the case and build as you go. No need to wait until the last minute.

Working with Sections: Top Tips

If you’re new to Bundledocs or simply are interested in learning more about sections and subsections, we’ve gathered together some of our top tips. You’ll be a pro in no time!

  • Save. When working with sections, subsections and volumes, we would always recommend saving as you go. Simply press the ‘Save‘ button. This will automatically re-number everything when your moving sections and documents.

  • Expand/Collapse. Did you know you can easily expand/collapse sections using the arrow to the left of your sections. Expand to view documents or any subsections. There’s even a expand/collapse button at the top of your screen so you can instantly open/close all sections at once. Find out more: Easily Expand/Collapse All Bundledocs Sections

  • Upload into a Section/SubSection. In our video we showed you how to move documents from one section to another. However, you can easily choose what section you want to upload documents on upload. Find out more: Can I upload files into a specific folder / section?

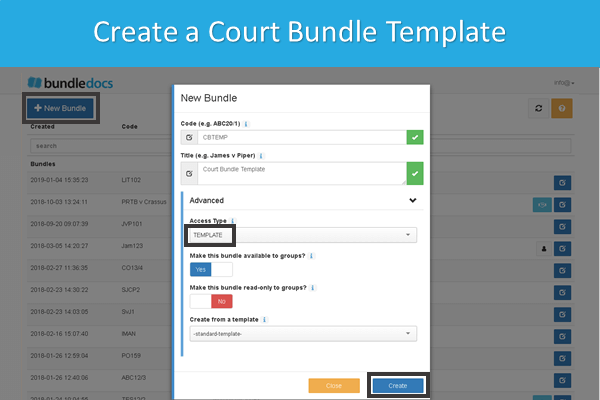
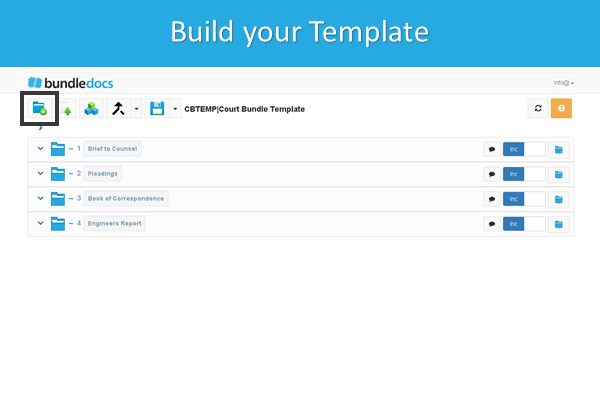
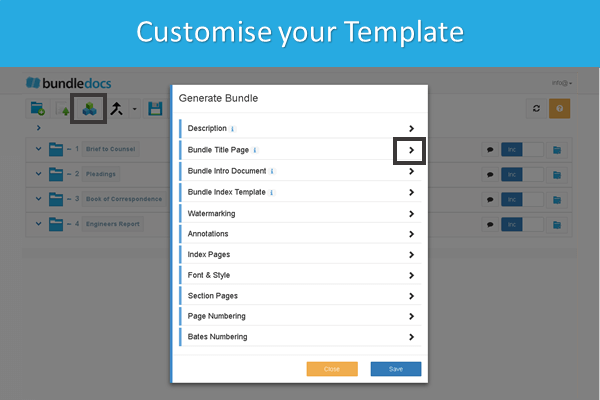
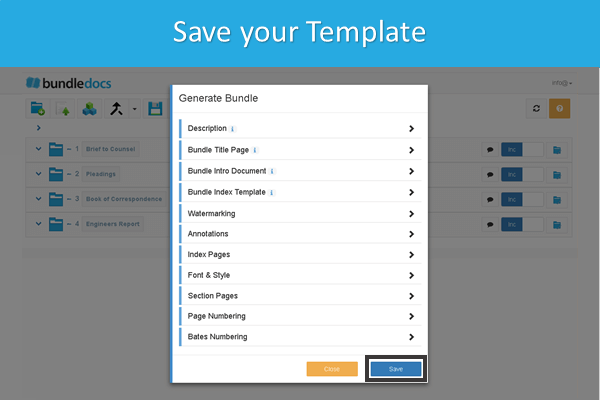
  • Use Templates. Templates are great for anyone creating the same types of bundles again and again. Using templates you can create the structure of your bundle (set sections and subsections) and save customisation settings too. Saving you time and effort. Find out more here: How to Prepare a Court Bundle Template with Bundledocs


If you’re interested in learning more about creating a bundle using Bundledocs, then get in touch. We can show you how easy it is to create bundles that adhere to court requirements, practice directions or even just your house style.

How to Prepare a Court Bundle Template with Bundledocs

Do you need to prepare a court bundle template or looking to see how to create a court bundle? Then you’ve come to the right place. Bundledocs court bundle software is your go-to solution if you need to easily prepare court bundles anytime, anywhere.

In this post we will take you through the simple steps needed to prepare a court bundle template, how to use your template to create bundles in seconds and even how to create a court bundle without a template. Let’s jump right in and see how it’s done…

Court_Bundle_Templates_Explained.png

Prepare a Court Bundle Template

Templates come in really handy for those that create bundles regularly. It will save you loads of time as you can save your bundle structure, format settings and won’t have to repeat the same steps time after time.


Top Tip! If you need to create a single court bundle then there’s really no need to create templates. Just jump down to the next section where we will take you through the simple steps needed to create a court bundle.

Follow these steps to create a court bundle template using Bundledocs:

  1. Create your Template. Name your template, within the ‘Advanced‘ section choose ‘Template‘ and hit ‘Create‘.

  2. Build your Template Sections. Create sections for your template (you can create as many as needed).

  3. Customise your Template. This step is optional but if you want to change the look and feel of your bundle this is where you do it. For example, upload a custom cover page; change where your page numbering appears; or even change how your index/table of contents page looks. So many possibilities!

  4. Save. That’s it. When you’re finished creating your court bundle template click ‘Save‘. All your settings will be saved and ready for when you need to create your court bundle.

That’s it. Your template is created now and ready for use. All templates appear on your home screen and can be changed or amended at any time.


Create a Court Bundle from your Template

Now we’ve successfully created our template, the next step will be to create our court bundle. We simply need to choose what template we want to use and Bundledocs will instantly create our bundle for us - pulling in all the customisations and settings we set previously.

Create_a_Bundle_From_a_Template_Bundledocs_Court_Bundle_Software.png
  1. Create your Bundle. Give your bundle a code and title name.

  2. Choose your Template. Expand the ‘Advanced‘ section and select a template to use for your bundle. For example, we will choose the ‘Court Bundle Template‘ we just created.

  3. Create. Simply hit ‘Create‘ to build your bundle.

  4. Ready to Go! Now our bundle is created we are ready to add documents and build our bundle.

Create a Court Bundle with Bundledocs

(No need to use templates - anyone can create a court bundle from scratch!)

Remember, you don’t need to create a template to create the perfect court bundle. Templates are really just a handy time saver for those that create bundles frequently. If you’re looking for a quick and easy way to create a court bundle, then here’s how you do it…


  1. Create your Bundle. Give your bundle a name and hit ‘Create’.

  2. Add Sections. Select the ‘New Section‘ button to create your sections (if you’ve created your bundle using templates this will be already done for you).

  3. Upload your Documents. Upload all your documents into your bundle sections. Just drag and drop your files to move them into the right place.

  4. Generate. We’re almost there. If you want to change any settings for your bundles you can do so here. Otherwise, just click the ‘Generate‘ button.

  5. Download. It’s complete. Your court bundle is instantly available to download, send or share.

The Ultimate Court Bundling Software

At Bundledocs we’re committed to making your life easier. That’s why we created an awesome solution to your court bundling woes. It’s simple really, we do all the hard work for you. Don’t believe us? Let’s take a quick look at how Bundledocs can help you create court bundles with ease.

  • Upload Any Document Type - A court bundle can contain a range of different document types from word documents, pdf, images, emails, scans. With Bundledocs you can upload any type of document and they will be automatically merged into a single PDF file when you generate.

  • Bundledocs Creates your Index Page - Your index page will contain a list of all documents contained within your court bundle. Bundledocs will create this index page for you. That’s not all. We will also hyperlink each item so you can instantly find what you want, when you want.

  • Bundledocs does all the Page Numbering - No need to worry about making sure the numbering of your bundle is right. We handle all this for you.

  • Changes are Simple - When it comes to creating court bundles, there are always changes to be made. Whatever change you need to make simply click Save and your bundle is updated.

  • Printed Court Bundle and Electronic Bundle - All bundles are instantly available in PDF format. So you can send by email, use Bundledocs Secure Share or download and print to have a physical hard copy court bundle.

No upfront fees, no install - just get going. Only need to create a single court bundle? No problem, we’ve plans available for everyone from self litigants, legal professionals and law firms worldwide.

Don’t believe us? Give it a try for yourself. We offer a free trial so you can give it a try before you sign up. There’s absolutely no obligation and no credit card required, so there’s no reason not to give it a go!

Make a Template Read-Only with Bundledocs - Feature Focus

If you use templates in Bundledocs you are in for a treat. We recently launched a new addition which makes templates even better for you and your team. Ready to learn more?

Templates_Blue (00018591xC5E42).PNG

What is this new addition you ask? In short, it helps you take better control of your templates - especially when working collaboratively in groups. Now you can lock your template and make it read-only. This means other group members can still access and use the template but will be unable to edit it (that is, unless you want them to!). 

How can I mark a template as read-only?

1. Choose Template: Simply choose a template you would like to make read-only. Select the 'Edit Details' button and click the 'Advanced' tab.

2. Mark as Read-Only: Select the option 'Make this bundle read-only to groups?'. Click 'Update' to save changes. 

A handy lock icon will then appear to the right of your template so you can see at a glance any template that will be read-only to other members. Nice!


Need to learn more? Our manual covers everything there is to know about Bundledocs. All you have to do is log into your account and check out our manual. It's available to everyone so login and check it out! 

Can I set a default template in Bundledocs? - Feature Focus

At Bundledocs, we are continually adding new features to help with the creation of your court bundles, trial briefs.. or whatever pdf binder you need to prepare. One feature our customers love is the ability to use templates, as it saves them having to create sections, apply customisations etc.

In today's post we will focus on how you can set default templates in Bundledocs. By using this feature, every time you hit the 'New Bundle' button (to create a new bundle) Bundledocs will automatically use this template. Don't worry, this can be changed at any time or you can even choose a different template for each new bundle you create. With so many options, simply feel free to choose an option that works for you.

Let's jump right in... how do you set a default template in Bundledocs? 

template_on.png

1. Set Default Template: Simply select the button to the right of your template to mark a template as a default. You can quickly see at a glance if the template is chosen as a dot will appear in the centre of the button.

2. Change Default Template: To change a default template to any other templates created in Bundledocs, simply select another template button. 

3. Remove Selected Template: You can remove your default template selection at any time, by simply selecting the button again. The dot will no longer appear in the centre of the button. If no button is selected then no template is selected. 


That's it! If you would like to give it a go for yourself make sure to login to your Bundledocs account - or better still download a copy of our complete training manual to discover everything there is to know about using templates in Bundledocs. Any questions? Let our support team know - they are happy to answer any queries you may have.