PRODUCT

How to Create a Closing Binder in PDF?

Looking for a way to easily create a closing binder in PDF format? We’ve outlined how this can be done in only 5 steps. So whether you need to create an electronic closing binder for legal transactions, residential real estate closing, mergers and acquisitions etc. - this is what you need to know.

How_To_Create_a_Closing_Binder_Electronically_in_PDF_Bundledocs_Software.png

What is an Electronic Closing Binder?

Before we jump into how to create electronic PDF closing binders, let’s first define what an electronic closing binder is?

In the past, closing binders were manually assembled by scanning, printing, and collating paper documents into a three-ring binder. These physical binders were then mailed to clients and relevant third parties. With advancements in technology, closing binders are now typically produced and delivered in digital formats, commonly referred to as electronic closing binders.

An electronic closing binder efficiently organizes and summarizes all documents associated with a transaction, including a closing statement and copies of every relevant document. These binders are fully text-searchable, indexed, and bookmarked, and once finalized, they can be quickly distributed to all involved parties.

Electronic closing binders are widely used in legal transactions, commercial and residential real estate closings, and mergers and acquisitions (M&A). Depending on the context, they may also be known by various other terms, such as closing books, record books, transaction  bibles, closing bibles, or deal bibles.

How can I create a closing binder in PDF?

If you need to create closing binders then you’ve come to the right place. Bundledocs is the ultimate electronic closing binder software and has everything you need in one place to create your binder quickly and easily. Here’s how it works…

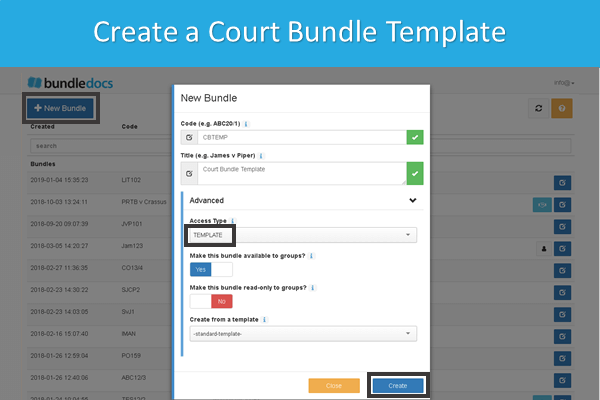
  1. Setting Up Your Closing Binder in Bundledocs. The first step to create your closing binder is to create the structure of your binder by creating sections and sub-sections. Create with a click and name as you wish.

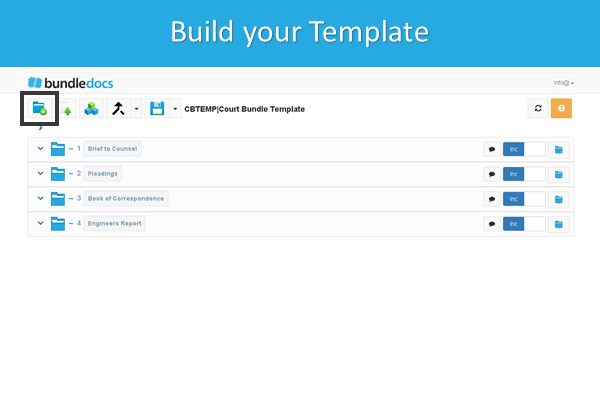
  2. Add Documents to your Binder. Once you’ve created the structure of your binder, you can then add documents. With Bundledocs you can access documents no matter where they’re stored. So whether they’re on your pc or need to be accessed via our seamless integration partner connectors - it’s all possible with Bundledocs.

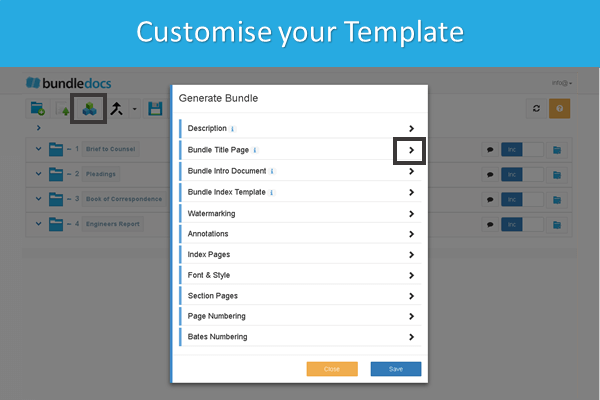
  3. Customizing Your Closing Binder. When you are ready to complete your closing binder, there are a number of ways you can customise it. For example, you can add a custom cover page; customise how you index page/ table of contents page appears; add page numbering etc.

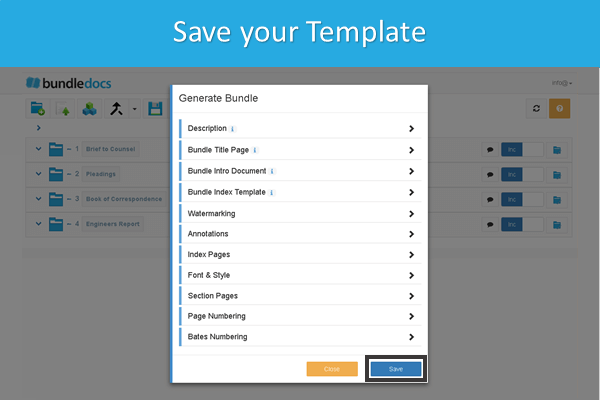
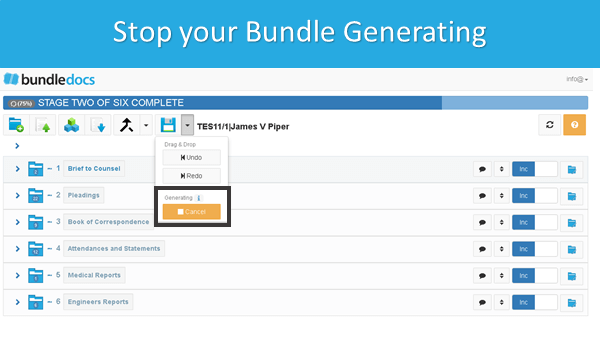
  4. Generating Your PDF Binder. When you are ready to complete your binder, simply click the ‘Generate‘ button. This will automatically merge all your uploaded files (regardless of file type) into a single PDF document. In an instant you will have a perfect pdf binder that is sectioned, indexed, bookmarked, hyperlinked and formatted for you.

  5. Print or Share Your Binder Securely. Now that your binder is complete it is ready to print or electronically share with others. Bundledocs offers an in-built secure share feature to make sending your completed electronic closing PDF binder easy. Perfect if binders are too big to send via email!

Interested to learn more about Bundledocs? Get in touch to arrange your FREE online demonstration and free 30-day trial.

Preparation of Court Bundles for Family Proceedings

If you need to create a court bundle for family law proceedings, then you’ve come to the right place. Bundledocs has everything you need to prepare, format and lodge your family law bundle. Ready to see how it works?

Prepare_Court_Bundle_Family_Proceedings_Practice_Direction_27a.png

Paper Bundles or Electronic Court Bundles

One of the best things about Bundledocs is that you don’t have to choose to create an electronic court bundle or a paper bundle - you can have both. As a 100% cloud based product all bundles created using Bundledocs will be immediately available in electronic PDF format. However, if your court requires bundles to be lodged in paper format then that’s possible too. It’s simple - just print!

In some cases, there may be a limit to the number of pages or sheets of A4 paper that are included in either your electronic court bundle or your paper bundle. With Bundledocs you don’t have to go counting pages, we do this for you so you can see at-a-glance how many pages are included in each section of your bundle.

Don’t believe us? We offer a free 30-day trial so you can try for free and see.

Format of the Court Bundle

When it comes to formatting your court bundle, Bundledocs court bundle software has a wide range of features to make it simple to customise your bundle so it looks just right. If you’re unsure what needs to be included in your bundle, how it’s formatted or how it’s ultimately logged then make sure to check out your courts practice directions. For example, the www.justice.gov.uk website contains Practice Direction 27A that outlines the court bundle requirements for family proceedings.


Unable to view? Watch now on YouTube - Create a Trial Bundle in Minutes


Add documents: With Bundledocs you can upload all the key documents relevant to your bundle. There is no document limit and most files types are supported. Including word documents, PDF, emails, images, maps etc. Plus, if your bundle requires your documents to be created in a specific font type or line spacing, this can all be done before uploading your documents into Bundledocs.

Read More: What types of files and documents does Bundledocs support?

Arrange your bundle in order: You can easily arrange your documents in chronological order i.e. in accordance with the time sequence in which they occurred. Bundledocs makes moving documents easy and it all can be done by simply dragging and dropping your files into place.

Video: Moving Bundledocs Documents Made Easy

Add sections: Each bundle can be divided into separate sections. With Bundledocs you can create as many sections and sub-sections as needed.

Index your bundle: Most bundles now require that an index page is included at the beginning of the bundle that lists all items in your bundle. Bundledocs automatically creates your index page and it’s fully customisable so it appears just as you like it.

Paginate your bundle: When preparing your bundle you will need to make sure it is paginated i.e. your pages are numbered correctly. Each page can be numbered individually and consecutively starting at Page 1. Bundledocs automatically handles pagination so your bundle is fully numbered with a single click. You can customise to suit and if any changes are needed, you simply re-generate and the page numbers are automatically updated.

How To: Restart page numbering for each section

Lodging the Court Bundle

One of the most important things to remember when preparing a court bundle for family proceedings is that it’s lodged and submitted to the courts on time. Regardless of whether you choose to print your bundle, send it to the court by post, DX, courier or provide it electronically. Again, refer to practice directions to see what methods are acceptable.

Does Bundledocs offer a way to share a paginated index to all parties before the hearing? Yes! Bundledocs offer a paperless way to easily share your paginated index with third parties, other side council etc. Check out our ‘Securely Send the Index Page to Other Side Counsel’ post to discover how this is done.


Interested to learn more about Bundleodcs? Get in touch today to arrange your free online demonstration or start your free 30-day trial today and give it a try for yourself.

Trial Bundle Preparation Made Easy - Video

A few years back we wrote a post all about trial bundles. We covered everything from what a trial bundle is; what is their purpose and why they’re important. If you didn’t get a chance to check it out, here is it: “Trial Bundles: Everything You Need To Know“. In that post we briefly touched on the steps needed to create a trial bundle. As we know that trial bundle preparation is a struggle for so many, we wanted to create a post to show you the simple way to prepare bundles using Bundledocs. Let’s jump right in…

How to Prepare a Trial Bundle using Bundledocs

(Don’t fancy reading today? Watch our short 2 minute video to see how it works!)

STEP ONE: CREATE & STRUCTURE YOUR TRIAL BUNDLE

To prepare our trial bundle we first need to create the structure. Easily create sections, sub-section and even volumes. You have complete control and can name the sections as you like. Need to make a change? Just double click! Bundledocs even offers the ability to create templates for your trial bundles which will save you even more time.

STEP TWO: ADD & NAME YOUR TRIAL DOCUMENTS 

Now that we've created the structure for our bundle, the next step is to add our trial documents. Using the upload button you can access your documents and upload them into your sections. You can upload documents from anywhere - your local pc, an online storage system (like Dropbox or Box); and we even have integrations with case/document management systems such as iManage, Tikit Partner for Windows, NetDocuments, Dropbox, Actionstep - to name just a few. Discover more about our integration partners.

STEP THREE: CUSTOMISE YOUR TRIAL BUNDLE

Now that we’ve created our sections and added our documents, we’re ready to customise our bundle to make sure it fits our firms house style, meets practice directions etc. There are many ways you can customise your trial bundle, however, if you need any help getting it just right then get in touch with our team.

Here are a few ways you can customise your trial bundle using Bundledocs:

Cover Page: Upload a custom cover page or let Bundledocs generate one for you.

Index Page: The days of manually creating an index page for your trial bundle is over. With a single click your index (or table of contents) page is created for you. It’s even hyperlinked too so you can quickly and easily search your casebook. Click and you're there!

Page or Bates Numbering: Paginating your trial bundle is done instantly. There are a number of ways you can customise it to make sure you get it just right.

STEP Four: DOWNLOAD OR SHARE ELECTRONICALLY

That’s it! When you are ready to complete your trial bundle, simply click the Generate button. Your bundle will be instantly available and can be shared electronically directly from Bundledocs, or downloaded, printed and saved. Do whatever works for you.


Interested to learn more about Bundledocs trial bundle software? We offer a free online demonstration where we take you through exactly how it all works. There’s no obligation and it only lasts about 15 minutes. Otherwise, we can get you setup with a FREE 30 day trial account so give it a try and see if it suits.

How to Prepare a Court Bundle Template with Bundledocs

Do you need to prepare a court bundle template or looking to see how to create a court bundle? Then you’ve come to the right place. Bundledocs court bundle software is your go-to solution if you need to easily prepare court bundles anytime, anywhere.

In this post we will take you through the simple steps needed to prepare a court bundle template, how to use your template to create bundles in seconds and even how to create a court bundle without a template. Let’s jump right in and see how it’s done…

Court_Bundle_Templates_Explained.png

Prepare a Court Bundle Template

Templates come in really handy for those that create bundles regularly. It will save you loads of time as you can save your bundle structure, format settings and won’t have to repeat the same steps time after time.


Top Tip! If you need to create a single court bundle then there’s really no need to create templates. Just jump down to the next section where we will take you through the simple steps needed to create a court bundle.

Follow these steps to create a court bundle template using Bundledocs:

  1. Create your Template. Name your template, within the ‘Advanced‘ section choose ‘Template‘ and hit ‘Create‘.

  2. Build your Template Sections. Create sections for your template (you can create as many as needed).

  3. Customise your Template. This step is optional but if you want to change the look and feel of your bundle this is where you do it. For example, upload a custom cover page; change where your page numbering appears; or even change how your index/table of contents page looks. So many possibilities!

  4. Save. That’s it. When you’re finished creating your court bundle template click ‘Save‘. All your settings will be saved and ready for when you need to create your court bundle.

That’s it. Your template is created now and ready for use. All templates appear on your home screen and can be changed or amended at any time.


Create a Court Bundle from your Template

Now we’ve successfully created our template, the next step will be to create our court bundle. We simply need to choose what template we want to use and Bundledocs will instantly create our bundle for us - pulling in all the customisations and settings we set previously.

Create_a_Bundle_From_a_Template_Bundledocs_Court_Bundle_Software.png
  1. Create your Bundle. Give your bundle a code and title name.

  2. Choose your Template. Expand the ‘Advanced‘ section and select a template to use for your bundle. For example, we will choose the ‘Court Bundle Template‘ we just created.

  3. Create. Simply hit ‘Create‘ to build your bundle.

  4. Ready to Go! Now our bundle is created we are ready to add documents and build our bundle.

Create a Court Bundle with Bundledocs

(No need to use templates - anyone can create a court bundle from scratch!)

Remember, you don’t need to create a template to create the perfect court bundle. Templates are really just a handy time saver for those that create bundles frequently. If you’re looking for a quick and easy way to create a court bundle, then here’s how you do it…


  1. Create your Bundle. Give your bundle a name and hit ‘Create’.

  2. Add Sections. Select the ‘New Section‘ button to create your sections (if you’ve created your bundle using templates this will be already done for you).

  3. Upload your Documents. Upload all your documents into your bundle sections. Just drag and drop your files to move them into the right place.

  4. Generate. We’re almost there. If you want to change any settings for your bundles you can do so here. Otherwise, just click the ‘Generate‘ button.

  5. Download. It’s complete. Your court bundle is instantly available to download, send or share.

The Ultimate Court Bundling Software

At Bundledocs we’re committed to making your life easier. That’s why we created an awesome solution to your court bundling woes. It’s simple really, we do all the hard work for you. Don’t believe us? Let’s take a quick look at how Bundledocs can help you create court bundles with ease.

  • Upload Any Document Type - A court bundle can contain a range of different document types from word documents, pdf, images, emails, scans. With Bundledocs you can upload any type of document and they will be automatically merged into a single PDF file when you generate.

  • Bundledocs Creates your Index Page - Your index page will contain a list of all documents contained within your court bundle. Bundledocs will create this index page for you. That’s not all. We will also hyperlink each item so you can instantly find what you want, when you want.

  • Bundledocs does all the Page Numbering - No need to worry about making sure the numbering of your bundle is right. We handle all this for you.

  • Changes are Simple - When it comes to creating court bundles, there are always changes to be made. Whatever change you need to make simply click Save and your bundle is updated.

  • Printed Court Bundle and Electronic Bundle - All bundles are instantly available in PDF format. So you can send by email, use Bundledocs Secure Share or download and print to have a physical hard copy court bundle.

No upfront fees, no install - just get going. Only need to create a single court bundle? No problem, we’ve plans available for everyone from self litigants, legal professionals and law firms worldwide.

Don’t believe us? Give it a try for yourself. We offer a free trial so you can give it a try before you sign up. There’s absolutely no obligation and no credit card required, so there’s no reason not to give it a go!

Is there anyway to stop a bundle being generated? - Questions & Answers

We’ve all been there. You’ve hit generate only to discover you weren’t quite ready. No need to worry, it’s simple to stop your bundle generating. Let us show you how.

Stop_Bundle_Generating_Questions_and_Answers_Bundledocs.PNG

Before we jump into how you can stop your bundle being generated, let’s cover a few of the basics…

What does it mean to generate your bundle? Bundledocs will revolutionise how you create bundles. When you generate your bundle, Bundledocs automatically merges all your documents into one single PDF file. It instantly creates an index page that lists all your sections, sub-sections and documents. It numbers everything, hyperlinks your complete index and adds bookmarks too. Amazing right?

Is it complicated? How do I generate a Bundle? It’s incredibly simple - just click one button!

Why would I need to stop a bundle generating? In most cases you won’t need to. However, if you’re creating and working on large complex bundles, this feature can come in handy. So if you ever have a time when you’ve hit generate only to discover that you weren’t quite ready yet - this will work great.

Quick View: How to Generate a Bundle with Bundledocs

How Do I Stop a Bundle Generating?

So you’ve hit generate but have discovered you need to make another couple of changes. Don’t fret, simply follow these steps to stop the process.


Step One: Select the ‘Save’ drop-down, as shown above.

Step Two: Click ‘Cancel Generating‘.


Yes, that’s really it. Now you’ve stopped the generating process, you’re free to make any changes you need. Perhaps re-order, change your index, remove that watermark - whatever it is, it’s always simple with Bundledocs!